Inbound filtering
Basic steps to protect your domain:
- Ensure the destination route is set to the MX record hostname provided by Office 365.
- Add a rule to Office365 to ensure email from the filtering servers is always accepted and not wrongly classified as spam.
- Change the MX records of the domain in the DNS to point to the SpamHitman provided MX record hostnames.
IP based rule to always accept from the filtering servers
In your Office 365 environment, you can create a partner connector and rule to bypass the local spam filtering for the filtering IPs.
- Log in to the Exchange Admin Center.
- Click on mail flow > connectors.

- Click the + (plus sign).
- Choose Partner organization as the From and Office 365 as the To, then click Next.
- Give the connector a name, then click Next.
- Choose Use the sender’s IP address then click Next.
- Add the SpamHitman IPs listed in Delivery IPs.
- Ensure that Reject email messages if they aren’t sent over TLS is ticked and click Next.
- Verify the settings and click Save.
- Click on Mail flow > Rules.
- Under Rules, click on the + (plus button) and choose Bypass spam filtering… .
- Enter a rule name (e.g. Disable filtering for SpamHitman).
- Choose Apply this rule if… > Senders IP Address is in any of these ranges or exactly matches…
- Add the SpamHitman delivery IPs listed in Delivery IPs.
- Ensure that Do the following… is set to: Modify the message properties > Set the spam confidence level (SCL) > Bypass spam filtering.

- Click OK.
- Click Save.
Spam filtering will no longer apply to the filtering servers, avoiding Office 365 to wrongly mark legitimate emails as spam (e.g. because SPF would fail).
X Header based rule to accept email from the filtering servers
The disadvantage of this method is that spammers could technically spoof the header, hence bypassing the build-in filtering. The advantage is that no IP addresses are required to be kept up-to-date.
- Login to the Office 365 “Exchange admin center”.
- In the Dashboard, select Rules in the Mail Flow section
- Under Rules, click the + button and choose Create a new rule… .
- Enter a Name for your rule, e.g. ‘SpamHitman spamfilter bypass’.
- Click More Options.
- Create Rule “A message header includes”X-Recommended-Action” header includes >> contains “accept”.
- Click +.
- Click OK.
- In the “Do the following” part, select “Modify the message properties” > “Set the spam confidence level (SCL)” > “Specify SCL” > “Bypass spam filtering”.
- Click OK.
Outbound filtering
Basic steps to protect your domain’s outbound mailflow, you need to:
- Add your sender Office365 sender domain as an “Authenticating Domain”, with “Re-authentication permitted:” explicitly set
- Setup a connector in Office 365 to relay the outgoing email via the email security smarthost
Setup outbound user in SpamHitman
- Go to the domain dashboard, choose Outgoing > Manage Users.
- At the bottom of the page, select the “Authenticating Domain” tab. Specify your Office365 sending domain, and provide a secure random password.
- Once the user has been added, click the dropdown icon on the left of the user and select “Edit“.
- Verify the configuration and ensure the limits are either disabled or match your expected traffic.
- Ensure “Re-authentication permitted” is selected. This is required for the sending domain to be allowed from Office365.
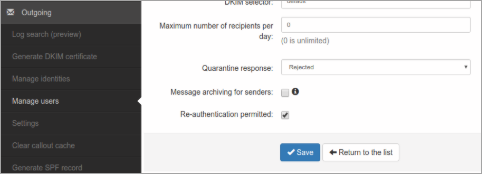
- Save the user settings.
Setup a transport rule in Office 365
- Login to the Office365 “Exchange admin center”.
- In the dashboard, go to Connectors in the Mail Flow section.
- Create a new connector from Office365 to Partner Organization and give it a name.
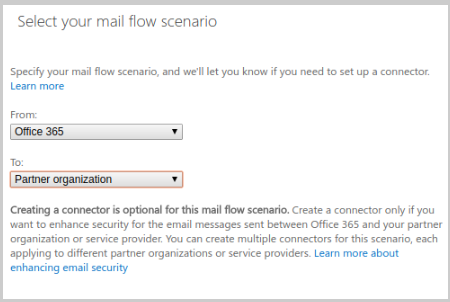
- Select Only when I have a transport rule set up that redirects messages to this connector.
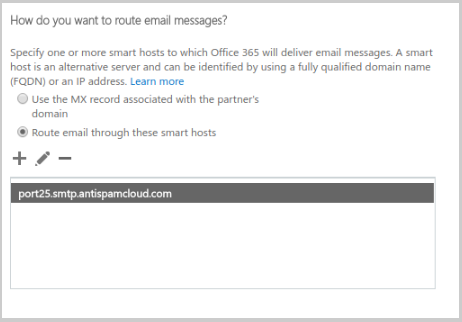
- Select “Route email through these smart hosts” and add port25.smtp.antispamcloud.com.
- Check Always use Transport Layer Security (TLS) to secure the connection (recommended) and select Issued by a trusted certificate authority (CA).

- Validate the connector (e.g. using recipient [email protected]) and save.
- In the Exchange Dashboard, go to Rules in the Mail Flow section.
- Under Rules, click the + button and choose Create a new rule… .
- Enter a Name for your rule, e.g. ‘Route sending domain via filtering smarthost’.
- Click More Options.
- Set “Apply this rule if…” to “The sender’s domain is…“.
- Specify as sender domain the domain you previously added as an “Authentication Domain” outgoing user to SpamHitman (similarly you could setup a rule for specific senders addresses only).
- Set “Do the following…” to “Redirect the message to“, “The following connector“.
- Set the smarthost connector you previous created.
- Save the rule.
Once this is done, any traffic matching your outgoing sender domain is relayed via the transport rule and be processed by the filtering servers.